How to Install Tally.ERP 9 Release 3.2 (Release 3.0 onwards) Multi User on Server machine or License Server?
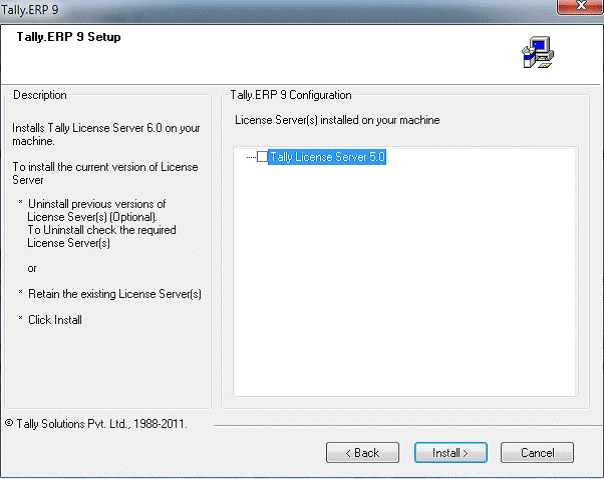
8. Check the required version(s) of license server that needs to be uninstalled.
9. Click Install The Tally.ERP 9 Setup screen is displayed as shown:
10. The Tally.ERP 9 Setup screen appears. In Tally.ERP 9 Configuration section accept the default directories or click on the buttons provided to change the path of Application Directory, Data Directory, Configuration Directory, Language Directory or License Directory respectively.
10. Click Next.
Installing Tally.ERP 9 Multi-User/Gold is broadly classified into the following:
- Installing Tally.ERP 9 on Server: Installs the License Service and Tally.ERP 9 on the computer designated as License Server.
- Installing Tally.ERP 9 on Client: Installs Tally.ERP 9 only on a computer in the LAN. The user needs to provide the license server’s Name or IP Address and Port Number.
We will first look at installing components License Server and Tally.ERP 9 on the server.
To install Tally.ERP 9 on a computer with Windows XXXX operating system, it is essential that the user has administrator rights (create, write, update, modify & delete) for Application, Data, Configuration, License and Language Directories
Installing Tally.ERP 9 on Server
Method 1:
- Double click the INSTALL.EXE icon available on the CD
Method 2 You can install both Tally.ERP 9 and License Server by using any one of the following methods:
- Double click the INSTALL.EXE icon available on the CD Or
- Click START from Windows
- Select RUN
- TYPE <CD drive>:\INSTALL
- Press ENTER
Follow the instructions displayed on your screen to proceed with the Installation of Tally.ERP 9. The Tally.ERP 9 Setup Wizard is displayed as shown.
1. Click Next to continue with Installation.
The Tally.ERP 9 Setup screen is displayed as shown:
2. Select Multi User
3. Select Server Machine
The Tally.ERP 9 Setup screen is displayed as shown:
To install License Server only uncheck the option Tally.ERP 9.
The procedure to install Tally.ERP 9 is similar to Client installation
4. Click Next
The Tally.ERP 9 Setup screen is displayed as shown:
5. In the Tally License Server Configuration section accepts the default License Server Directory, Port number and License Directory or specify the License Server Directory, Port and License Directory of your choice.
6. Click Install
7. On detecting earlier version(s) of License Server installed on your computer. The installer displays LicenseServers Installed.
- Application Directory: Tally.ERP 9 program files reside in this directory.
- Data Directory: Tally.ERP 9 data resides in this directory.
- Configuration Directory: Tally.ERP 9 configuration file reside in this directory.
- Language Directory: Tally.ERP 9 language files (.dct) reside in this directory.
- License Directory: Tally.ERP 9 license file (.lic) resides in this directory.
11. In the Country/Language Selection screen, check Install Operating System Language Support to install Tally.ERP 9 with multi-lingual support.
12. In Country Selection choose India/SAARC when you are residing in India or SAARC countries else choose Others.
To use Tally.ERP 9 in English only, uncheck Install Operating Systems Language Support
13. Click Install.
The Setup Status screen is displayed as shown:
When language support files are not available, installer prompts for language support files in the Files Needed screen. Insert operating systems CD in the drive or click Browse and select the i386 folder where the required language support files reside on your computer.
Click OK to install Language Support. Click Cancel when you do not have the operating system CD.
On detecting an active Windows firewall on the license server, the installer displays the following message.
14. Click Yes to allow the Tally License Server accept connections from its clients
15. On successful installation of Tally.ERP 9, the Tally.ERP 9 Installed Successfully screen will be displayed as shown:


